Resize and crop images for use on this site
Images are often provided to page authors/editors at sizes, or with proportions that make them unsuitable for use without some work.
Typically, professionally-taken photographs, or even snaps taken on a recent phone, will be far too big. Not only is it possible that your upload will be forbidden because the file is bigger than the system allows, but even if the image can be uploaded, there is no value in attaching a picture that is 4000px x 3000px to a page where it will be displayed at a tenth of that size. At the very least, the page will load more slowly than it could.
Fortunately, it is easy to resize an image to optimise it for use on the site.
Find the image file on your computer, or save it there if it's attached to an email or in a document, then double-click to open it in the default Windows Photos app.
To resize...
Click the … to open the 'more items' list.

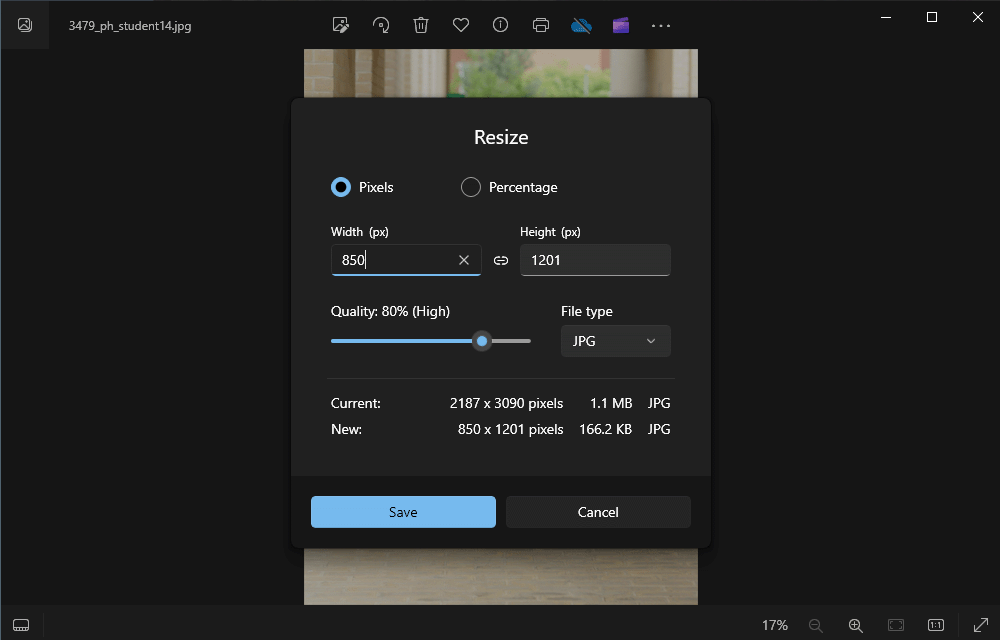
Choose the Resize image option

Set a suitable size for the image. You may find it useful to check the recommended sizes in the table shown in the pop-up below.

For a picture to be used in the main text section of a page like all of those you see here, the height is not important, as the space will flex to accommodate the image. In some other contexts - for example photos that are to be used on a profile page, or listing images that are displayed on the grid of news items or on a section index page - the shape is important, and if the width:height proportions aren't correct the system will automatically crop a section from the centre of the image, which can have undesirable results.
Recommended picture sizes (and unwanted cropping)
The following sizes are currently recommended. (You may rarely actually see images displayed at these sizes, but they allow for, eg extra-high-resolution displays such as 4K screens and Apple's Retina monitors.)
| Type | W | H | Note |
|---|---|---|---|
| Full width image | 1800 | 800 | added by, eg, Add Full width image in Page builder |
| Image in regular text block | 1200 | any | Using Edit Media button to set Width 100% |
| Image in regular text block | 850 | any | Using Edit Media button to set Width 50% or Width 25% |
| Listing image | 1000 | 640 | Make sure the shape is the right ratio to avoid unexpected cropping. |
| Profile photo | 300 | 300 |
This image illustrates what can happen if a Listing image is not the right shape. While the image size is also important, the main issue here is the width:height ratio. Ideally the image should be 1000 x 640, but half those dimensions - 500 x 320 - would be acceptable in many circumstances, as would eg 750 x 480.

(The portrait image used on the right above was 3161 x 4215.)
To crop...
First, resize the image as describe above, to get it to the width you need, then...
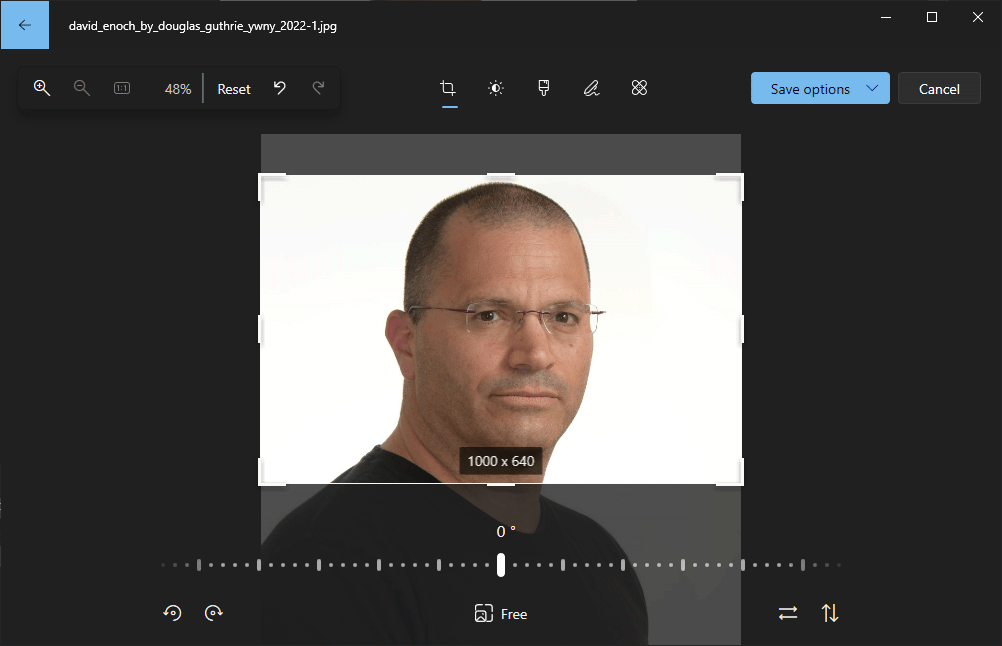
Use the Edit button to show the crop tool:

Use the drag handles on the crop tool to select part to fit the size an shape you need:

Note that it isn't always possible to get a perfect crop, but it will often be possible to improve on what is offered automatically.
Sometime you might need to make an image extra wide. For example to avoid the situation with the logo in the example above. The default Windows tool doesn't offer the ability to make the 'canvas' bigger. One workaround is to insert the image into a Word document then use Windows' built-in Snipping tool (or similar) to capture and save the image with extra white space at the sides or top and bottom.
Here's a screenshot of the same page as shown above with the original listing images resized and cropped:

Portrait image showing as landscape when uploaded?

or vice versa.
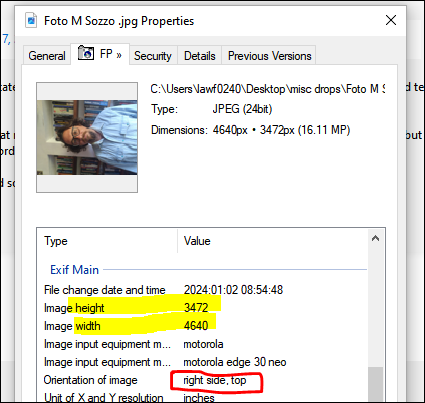
A rare(-ish) quirk of some cameras - particularly phone cameras - is the way they store data about a photo’s orientation. The file details in the screenshot show that this particular image is recorded as being wider than it is tall:

Crucially, the data that says ‘right side, top’ means ‘turn 90 degrees clockwise’ for display. It would seem that while the Windows viewer and editor are able to understand this bit of extra data and so present the image correctly, the Drupal CMS behind this website (in common with plenty of other tools, like the properties inspector thumbnail you can see above) don’t take account of it.
However there is an easy fix. Don't rotate it, as that just changes the orientation data, but leaves the width and height settings the same, which means that Drupal still won’t understand what to do. Instead, from the Photo app, use Save as… to change the file format to .png instead of .jpg. In general this is not best practice, because jpgs give smaller file sizes and truer colours as the format was designed specifically for photographs. The png file will be bigger, but it doesn’t contain any hidden data, so Drupal just takes it as it saved from Photos - ie the right way up.
